Thursday, December 17, 2015

Drawing a flag as overlay on top of MKMapView

The source code of the following can be found at https://github.com/cspnanda/DrawFlag

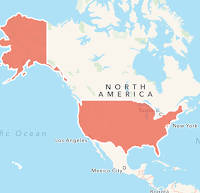
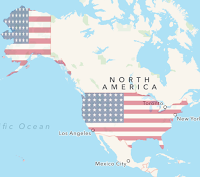
I have been working on a travel related app where I want to highlight the countries I have visited. Now MKMapView allows you to create a polygon and stroke it with a color fill. It can be achieved with few lines of code in rendererForOverlay.


MKPolygonRenderer *renderer=[[MKPolygonRenderer alloc] initWithPolygon:overlay];renderer.fillColor = [UIColor colorWithRed:0.93 green:0.35 blue:0.26 alpha:0.7];
renderer.strokeColor = [[UIColor whiteColor] colorWithAlphaComponent:1.0];
renderer.lineWidth   = 2;
return renderer;

This will create an image like below. It looked good but not great. I wanted to get something more interesting like the image in right.


How do we do that ? It is a combination of following steps.
  • Construct a polygon from the map points and add as an overlay to MKMapView.
  • Subclass the MKPolygonRenderer and override the drawMapRect
  • Create a UIBezierPath from the path property of polygon. Close the path.
  • Add clip to path for intersect.
  • Draw the overlay image.

Step 1 : Construct the polygon 

You need points which will construct the boundary of the country. I loaded the JSON file and constructed the map overlay using


  if(overLayDict == Nil)
    overLayDict = [[NSMutableDictionary alloc] init];
  NSString *fileName = [[NSBundle mainBundle] pathForResource:@"gz_2010_us_040_00_500k" ofType:@"json"];
  NSData *overlayData = [NSData dataWithContentsOfFile:fileName];
  NSArray *countries = [[NSJSONSerialization JSONObjectWithData:overlayData options:NSJSONReadingAllowFragments error:nil] objectForKey:@"features"];
  for (NSDictionary *country in countries) {
    NSMutableArray *overlays = [[NSMutableArray alloc] init];
    NSDictionary *geometry = country[@"geometry"];
    if ([geometry[@"type"] isEqualToString:@"Polygon"]) {
      MKPolygon *polygon = [ViewController overlaysFromPolygons:geometry[@"coordinates"] id:country[@"properties"][@"name"]];
      if (polygon) {
        [overlays addObject:polygon];
      }
      
      
    } else if ([geometry[@"type"] isEqualToString:@"MultiPolygon"]){
      for (NSArray *polygonData in geometry[@"coordinates"]) {
        MKPolygon *polygon = [ViewController overlaysFromPolygons:polygonData id:country[@"properties"][@"name"]];
        if (polygon) {
          [overlays addObject:polygon];
        }
      }
    } else {
      NSLog(@"Unsupported type: %@", geometry[@"type"]);
    }
    [overLayDict setObject:overlays forKey:country[@"properties"][@"name"]];
  }

Step 2 : Override the drawRect in MKPolygonRenderer


- (void)drawMapRect:(MKMapRect)mapRect zoomScale:(MKZoomScale)zoomScale inContext:(CGContextRef)context {
  [super drawMapRect:mapRect zoomScale:zoomScale inContext:context];
  MKMapRect theMapRect = [self.overlay boundingMapRect];
  CGRect theRect = [self rectForMapRect:theMapRect];
  @try {
    UIGraphicsPushContext(context);
    UIBezierPath *bpath = [UIBezierPath bezierPath];
    MKPolygon *polyGon = self.polygon;
    MKMapPoint *points = polyGon.points;
    NSUInteger pointCount = polyGon.pointCount;
    CGPoint point = [self pointForMapPoint:points[0]];
    [bpath moveToPoint:point];
    for (int i = 1; i < pointCount; i++) {
      point = [self pointForMapPoint:points[i]];
      [bpath addLineToPoint:point];
    }
    [bpath closePath];
    [bpath addClip];
    [_overlayImage drawInRect:theRect blendMode:kCGBlendModeMultiply alpha:0.4];
    UIGraphicsPopContext();
  }
  @catch (NSException *exception) {
    NSLog(@"Caught an exception while drawing radar on map - %@",[exception description]);
  }
  @finally {
  }
}

Thursday, July 30, 2015

Word Highlighting in a read-to-me app

One of the common use case while developing a read-to-me book apps is highlight the word as it is read to the user. In this example we discuss how we can achieve it. The source code is at https://github.com/cspnanda/TextHighlight

We are going to use a UIWebView for this. UIWebView uses HTML so can be easily styled. I found it easier than using the NSAttributedString with a TextView. For this purpose we will need a audio file and a file containing beginning time offset and lengths of each word. 

The text we are going to display is "The quick brown fox jumps over the lazy dog". In the offset file you will need 9 value pairs, one for each word. I really want to know if there is a better way to solve it, but did not find any. To easily find the time offset, you can open your sound file in Audacity. The words are waveforms and the pause between the words are flat.


Then add these values to a plist file. The plist file now looks like
<dict>
        <key>offset</key>
        <array>
                <array>
                        <string>The</string>
                        <real>0.019</real>
                        <real>0.218</real>
                </array>
                <array>
                        <string>quick</string>
                        <real>0.237</real>
                        <real>0.283</real>
                </array>
                <array>
                        <string>brown</string>
                        <real>0.52</real>
                        <real>0.382</real>
                </array>

Then we need to have a timer which will fire at those specific intervals.

[NSTimer scheduledTimerWithTimeInterval:[[thisWord objectAtIndex:2] floatValue]
     target:self
     selector:@selector(highlightText)
     userInfo:nil
     repeats:NO];

In the highligtText function we have to set all the words except the current one in normal color and highlight the current word.

htmlString = [htmlString stringByAppendingString:@"<span class='highlight'> "];
htmlString = [htmlString stringByAppendingString:[words 
              objectAtIndex:currentWord]];
htmlString = [htmlString stringByAppendingString:@"</span> "];

Then we invalidate the current timer and schedule for the next word.

[webView loadHTMLString:htmlString baseURL:nil];
currentWord++;
[timer2 invalidate];
timer2 = Nil;
timer2 = [NSTimer scheduledTimerWithTimeInterval:([[thisWord objectAtIndex:2] floatValue])
    target:self
    selector:@selector(highlightText)
    userInfo:nil
    repeats:NO];

Now when you run the project, you get an output like


Sunday, July 5, 2015

Water fall animation using Particle System

Water falling is a cool piece of animation in iOS apps. I had to use particle system to create an animation where water hose is spraying water. Think of the real water hose.

1. You have a continuous flow of water which are collection of water drops. 
2. The shape in which water falls (you may have seen the settings on the hose - shower, mist, full etc).

The above two concepts translate exactly to the concepts of emitter cell and an emitter layer.


There is one more thing: 

In the real world, water will always fall down because of gravity. But in programming world water direction need to be controlled. This is controlled by a property called emissionLongitude.


The complete code is checked into https://github.com/cspnanda/ParticleSystem
Official apple API docs are here and here

 1
 2
 3
 4
 5
 6
 7
 8
 9
10
11
12
13
14
15
16
17
18
// Initialize the Emitter Cell. drop is a simple picture of water. From apple doc
// A layer can set this property to a CGImageRef to display the image as its contents.

    CAEmitterCell *emitterCell = [CAEmitterCell emitterCell];
    emitterCell.contents = (id) [[UIImage imageWithContentsOfFile:[[NSBundle mainBundle] pathForResource:@"drop" ofType:@"png"]] CGImage];

    // Define the velocity range - The amount by which the velocity of the cell can vary. 
    emitterCell.velocityRange = 1;

    // The angle in which water will fall
    emitterCell.emissionRange = M_PI_2;

    // Set the x and y component of an acceleration vector
    emitterCell.xAcceleration=-10;
    emitterCell.yAcceleration=300;

    // Set the emissionLongitude
    emitterCell.emissionLongitude = longitude;


// Constructing emitterLayer

// Initialize the Layer
emitterLayer = (CAEmitterLayer *) self.layer;
// Set the emitter cell as part of emitterLayerContents
emitterLayer.emitterCells = [NSArray arrayWithObject: emitterCell];

// Add the emitter Layer to main view
[self.view addSubview:waterFall];

Voila. Now when you compile the code and run, you should see water hose spraying water.

Let us look at two properties of emitter cell. xAcceleration and yAcceleration. As the name xAcceleration is how the water travels in X axis and yAcceleration is how water travels in Y axis. In the segment control when we set the yAcceleration to 0 we see no particles fall in Y axis.

Monday, June 29, 2015

Integrated Image Picker for iOS

In this post I am going to discuss about a Custom integrated image picker for iOS with code examples. So why another image picker ? There are hundreds available on the github and the default UIImagePicker in SDK does the job too. These are the reasons why I wrote a custom image picker.


  • In most image picker you switch between the camera and image gallery. But in this one you get one view controller and you get both. Inspired by Facebook iOS app.
  • This image picker has a live preview using AVCaptureSession. Inspired by Twitter iOS app.


So now let us jump right into the code. The code is hosted with example project on github at https://github.com/cspnanda/CustomImagePicker


Step 1: Setup Collection View

Make a UICollectionView and have two kind of cells. One for gallery images (ALAssets) and the other for camera (This is Cell no 0). The XIB file is actually pretty simple. You have a UICollectionView and a next button. Connect the collectionView datasource and delegate to self and set the referencing outlet. All the magic happens in the code.


Step 2 : Populate the collection view Data Source


Now we need to iterate through the Assets and populate the collection view. Open the viewDidLoad in your View Controller and add the following code. Here the first element I add is the camera cell. Then the ALAssetsLibrary block iterate through all the photos in library. Note: You may want to do it in a background thread with GCD and call the dispatch_get_main_queue and update the UI (reload collection view)


  [self.collectionView registerClass:[PhotoPickerCell class] forCellWithReuseIdentifier:@"PhotoPickerCell"];
  [self.collectionView registerClass:[CameraCell class] forCellWithReuseIdentifier:@"CameraCell"];
  
  UICollectionViewFlowLayout *flowLayout = [[UICollectionViewFlowLayout alloc] init];
  if(IS_IPHONE_6 || IS_IPHONE_6P)
    [flowLayout setItemSize:CGSizeMake(120, 120)];
  else
    [flowLayout setItemSize:CGSizeMake(100, 100)];
  [flowLayout setScrollDirection:UICollectionViewScrollDirectionVertical];
  [self.collectionView setCollectionViewLayout:flowLayout];
  
  _assets = [@[] mutableCopy];
  __block NSMutableArray *tmpAssets = [@[] mutableCopy];
  if ([UIImagePickerController isSourceTypeAvailable:UIImagePickerControllerSourceTypeCamera]) {
    ALAsset *asset = [[ALAsset alloc] init];
    if(showOnlyPhotosWithGPS==NO)
      [tmpAssets insertObject:asset atIndex:0];
  }
  ALAssetsLibrary *assetsLibrary = [CustomeImagePicker defaultAssetsLibrary];
  [assetsLibrary enumerateGroupsWithTypes:ALAssetsGroupSavedPhotos usingBlock:^(ALAssetsGroup *group, BOOL *stop) {
    [group setAssetsFilter:[ALAssetsFilter allPhotos]];
    [group enumerateAssetsWithOptions:NSEnumerationReverse usingBlock:^(ALAsset *result, NSUInteger index, BOOL *stop) {
      if(result)
      {
        if(showOnlyPhotosWithGPS == YES)
        {
          if([result valueForProperty:ALAssetPropertyLocation])
            [tmpAssets addObject:result];
        }
        else
          [tmpAssets addObject:result];
      }
    }
     ];
    
  } failureBlock:^(NSError *error) {
    NSLog(@"Error loading images %@", error);
    if([ALAssetsLibrary authorizationStatus] != ALAuthorizationStatusAuthorized)
    {
      [self displayErrorOnMainQueue:@"Photo Access Disabled" message:@"Please allow Photo Access in System Settings"];
    }
  }];
  self.assets = tmpAssets;
  dispatch_time_t popTime1 = dispatch_time(DISPATCH_TIME_NOW, 0.5 * NSEC_PER_SEC);
  dispatch_after(popTime1, dispatch_get_main_queue(), ^(void){
    if(showOnlyPhotosWithGPS==YES) {
    OLGhostAlertView *ghastly = [[OLGhostAlertView alloc] initWithTitle:@"Photos with Location" message: @"Only Photos with Location Information are shown here." timeout:2.0 dismissible:YES];
    [ghastly show];
    }

    [self.collectionView reloadData];
  });

Now we need to implement few UICollectionView methods. Look carefully at the method cellForItemAtIndexPath. It maintains an array which holds the photos you selected. Once the number of photos selected reaches the max (defined by you in MAX_PHOTOS) we gray out the other cells. When you run the code you will get a collection view like shown in right.


Step 3 : Implement delegate methods (click to expand)


- (UICollectionViewCell *) collectionView:(UICollectionView *)collectionView cellForItemAtIndexPath:(NSIndexPath *)indexPath
{
  static NSString *cellIdentifier = @"PhotoPickerCell";
  static NSString *cameraCellIdentifier = @"CameraCell";
  
  if([UIImagePickerController isSourceTypeAvailable:UIImagePickerControllerSourceTypeCamera])
  {
    if(indexPath.row == 0 && indexPath.section == 0 && showOnlyPhotosWithGPS == NO)
    {
      CameraCell *cell = (CameraCell *)[collectionView dequeueReusableCellWithReuseIdentifier:cameraCellIdentifier forIndexPath:indexPath];
      ALAsset *asset = self.assets[indexPath.row];
      ALAssetRepresentation *rep = [asset defaultRepresentation];
      NSString *assetURL = [[rep url] absoluteString];
      cell.asset = asset;
      cell.backgroundColor = [UIColor whiteColor];
      if([highLightThese containsObject:assetURL])
      {
        cell.layer.borderColor = [[UIColor orangeColor] CGColor];
        cell.layer.borderWidth = 4.0;
        [cell setAlpha:1.0];
        [cell setUserInteractionEnabled:YES];
      }
      else
      {
        if([highLightThese count] == maxPhotos)
        {
          cell.layer.borderColor = nil;
          cell.layer.borderWidth = 0.0;
          [cell setAlpha:0.5];
          [cell setUserInteractionEnabled:NO];
        }
        else
        {
          cell.layer.borderColor = nil;
          cell.layer.borderWidth = 0.0;
          [cell setAlpha:1.0];
          [cell setUserInteractionEnabled:YES];
        }
      }
      return cell;
    }
    else
    {
      PhotoPickerCell *cell = (PhotoPickerCell *)[collectionView dequeueReusableCellWithReuseIdentifier:cellIdentifier forIndexPath:indexPath];
      
      ALAsset *asset = self.assets[indexPath.row];
      ALAssetRepresentation *rep = [asset defaultRepresentation];
      NSString *assetURL = [[rep url] absoluteString];
      cell.asset = asset;
      cell.backgroundColor = [UIColor whiteColor];
      if([highLightThese containsObject:assetURL])
      {
        cell.layer.borderColor = [[UIColor orangeColor] CGColor];
        cell.layer.borderWidth = 4.0;
        [cell setAlpha:1.0];
        [cell setUserInteractionEnabled:YES];
      }
      else
      {
        if([highLightThese count] == maxPhotos)
        {
          cell.layer.borderColor = nil;
          cell.layer.borderWidth = 0.0;
          [cell setAlpha:0.5];
          [cell setUserInteractionEnabled:NO];
        }
        else
        {
          cell.layer.borderColor = nil;
          cell.layer.borderWidth = 0.0;
          [cell setAlpha:1.0];
          [cell setUserInteractionEnabled:YES];
        }
      }
      return cell;
    }
  } // Device with Camera
  else
  {
    PhotoPickerCell *cell = (PhotoPickerCell *)[collectionView dequeueReusableCellWithReuseIdentifier:cellIdentifier forIndexPath:indexPath];
    
    ALAsset *asset = self.assets[indexPath.row];
    ALAssetRepresentation *rep = [asset defaultRepresentation];
    NSString *assetURL = [[rep url] absoluteString];
    cell.asset = asset;
    cell.backgroundColor = [UIColor whiteColor];
    if([highLightThese containsObject:assetURL])
    {
      cell.layer.borderColor = [[UIColor orangeColor] CGColor];
      cell.layer.borderWidth = 4.0;
      [cell setAlpha:1.0];
      [cell setUserInteractionEnabled:YES];
    }
    else
    {
      if([highLightThese count] == maxPhotos)
      {
        cell.layer.borderColor = nil;
        cell.layer.borderWidth = 0.0;
        [cell setAlpha:0.5];
        [cell setUserInteractionEnabled:NO];
      }
      else
      {
        cell.layer.borderColor = nil;
        cell.layer.borderWidth = 0.0;
        [cell setAlpha:1.0];
        [cell setUserInteractionEnabled:YES];
      }
    }
    return cell;
  } //  Device Without Camera
  return Nil;
}


- (NSInteger) collectionView:(UICollectionView *)collectionView numberOfItemsInSection:(NSInteger)section
{
  return self.assets.count;
}
- (CGFloat) collectionView:(UICollectionView *)collectionView layout:(UICollectionViewLayout *)collectionViewLayout minimumLineSpacingForSectionAtIndex:(NSInteger)section
{
  return 4;
}

- (CGFloat) collectionView:(UICollectionView *)collectionView layout:(UICollectionViewLayout *)collectionViewLayout minimumInteritemSpacingForSectionAtIndex:(NSInteger)section
{
  return 1;
}


Step 4 : Add the live camera feed to first cell


For this you need to use the AVCaptureSession. Add the header files and define the instance variables.

#import <AssetsLibrary/AssetsLibrary.h>

/* Define following instance variable */

  AVCaptureSession *session;
  AVCaptureVideoPreviewLayer *captureVideoPreviewLayer;
  AVCaptureStillImageOutput *stillImageOutput;

Now initialize the AVCaptureSession and start running the instance. This code has been borrowed heavily from here and reference


Now you can call this method initializeCamera like

    [self performSelector:@selector(initializeCamera) withObject:nil afterDelay:0.1];


- (void) initializeCamera {
  if (session)
    [session release], session=nil;
  CameraCell *firstCell = (CameraCell*)[self.collectionView cellForItemAtIndexPath:[NSIndexPath indexPathForRow:0 inSection:0]];
  UIImageView *view = [firstCell getImageView];
  session = [[AVCaptureSession alloc] init];
  session.sessionPreset = AVCaptureSessionPresetLow;
  
  if (captureVideoPreviewLayer)
    [captureVideoPreviewLayer release], captureVideoPreviewLayer=nil;
  
  captureVideoPreviewLayer = [[AVCaptureVideoPreviewLayer alloc] initWithSession:session];
  [captureVideoPreviewLayer setVideoGravity:AVLayerVideoGravityResizeAspectFill];
  
  captureVideoPreviewLayer.frame = view.bounds;
  [view.layer addSublayer:captureVideoPreviewLayer];
  
  
  CALayer *viewLayer = [view layer];
  [viewLayer setMasksToBounds:YES];
  
  CGRect bounds = [view bounds];
  [captureVideoPreviewLayer setFrame:bounds];
  
  NSArray *devices = [AVCaptureDevice devices];
  AVCaptureDevice *backCamera=nil;
  
  // check if device available
  if (devices.count==0) {
    NSLog(@"No Camera Available");
    return;
  }
  
  for (AVCaptureDevice *device in devices) {
    
    NSLog(@"Device name: %@", [device localizedName]);
    
    if ([device hasMediaType:AVMediaTypeVideo]) {
      
      if ([device position] == AVCaptureDevicePositionBack) {
        NSLog(@"Device position : back");
        backCamera = device;
      }
    }
  }
  NSError *error = nil;
  AVCaptureDeviceInput *input = [AVCaptureDeviceInput deviceInputWithDevice:backCamera error:&error];
  if (!input) {
    NSLog(@"ERROR: trying to open camera: %@", error);
  }
  else
  {
    [session addInput:input];
    if (stillImageOutput)
      [stillImageOutput release], stillImageOutput=nil;
    
    stillImageOutput = [[AVCaptureStillImageOutput alloc] init];
    NSDictionary *outputSettings = [[[NSDictionary alloc] initWithObjectsAndKeys: AVVideoCodecJPEG, AVVideoCodecKey, nil] autorelease];
    [stillImageOutput setOutputSettings:outputSettings];
    
    [session addOutput:stillImageOutput];
    
    [session startRunning];
  }
  
}


At this time when you run the code on real device (simulator has no camera support) you will see a real preview from back camera. Is not it cool ? You can either select photos or click on the camera to take a capture. The camera capture code using AVCaptureCode have been heavily borrowed from here

Once you choose the photos, you need to implement the delegate

-(void) imageSelected:(NSArray *)arrayOfImages
to get the list of assets picked. One last thing. When you click an image using AVCaptureSession it did not contain Location Exif information. So I had to manually add it like
CFMutableDictionaryRef mutable = CFDictionaryCreateMutableCopy(NULL, 0, attachments);
          NSTimeZone      *timeZone   = [NSTimeZone timeZoneWithName:@"UTC"];
          NSDateFormatter *formatter  = [[NSDateFormatter alloc] init];
          [formatter setTimeZone:timeZone];
          [formatter setDateFormat:@"HH:mm:ss.SS"];
          NSDictionary *gpsDict   = [NSDictionary dictionaryWithObjectsAndKeys:
                                     [NSNumber numberWithFloat:fabs(currentUserLocation.coordinate.latitude)], kCGImagePropertyGPSLatitude
                                     , ((currentUserLocation.coordinate.latitude >= 0) ? @"N" : @"S"), kCGImagePropertyGPSLatitudeRef
                                     , [NSNumber numberWithFloat:fabs(currentUserLocation.coordinate.longitude)], kCGImagePropertyGPSLongitude
                                     , ((currentUserLocation.coordinate.longitude >= 0) ? @"E" : @"W"), kCGImagePropertyGPSLongitudeRef
                                     , [formatter stringFromDate:[currentUserLocation timestamp]], kCGImagePropertyGPSTimeStamp
                                     , [NSNumber numberWithFloat:fabs(currentUserLocation.altitude)], kCGImagePropertyGPSAltitude
                                     ,[NSNumber numberWithFloat:currentUserLocation.horizontalAccuracy],kCGImagePropertyGPSDOP
                                     
                                     , nil];
          
          
          CFDictionarySetValue(mutable, kCGImagePropertyGPSDictionary, (__bridge void *)gpsDict);

Thanks for reading. If you decide to use the control in your application don't forget to give a credit back to me. It means a lot to me. Happy coding.